Download & Install 30 Day Free Trial for SQLite Configuration.

Follow these Steps to Download, Install and configure Zümmer for an SQLite data source.

Step 0: SQLite Installation Prerequisite

Before installing Zümmer for an SQLite configuration, download and install the 32 bit SQLite ODBC Driver.

Go to:

http://www.ch-werner.de/sqliteodbc/

…then download the file “sqliteodbc.exe” for 32 Bit and perform the installation procedures.

Verify that the SQLite ODBC Driver installation completed properly by accessing the ODBC Data Source Administrator (32-bit), then clicking on “Drivers” tab as shown below:

The SQLite ODBC drivers are shown above demonstrating a correct installation.

Step 1: Access the Zümmer download files here

From the Website sample download screen shown below, select the Download option, then select the save option to download the files. The files will be downloaded to your “Downloads” folder or to your configured downloads location.

 Click OK to continue with the download procedures.

Next, navigate to the Downloads folder, then look for the Zummer – 30 Day – SQL.zip file.

Step 2: Unzip the Zummer files and copy files to a local drive & folder:

Double-click on the Zummer – 30 Day – SQL.zip file to display the Zummer folder as shown below:

Copy the Zummer folder shown below to an appropriate place on your Personal Computer or local drive.

It is highly recommended that the Zümmer be placed somewhere in the “Documents” or “My Documents” folder.

     Open the Zümmer folder, then verify that the download has completed successfully. The Zummer folder consists of 16 files and 4 subfolder as shown below:

Next, open the Data folder, then verify that the folder consists of 25 files as shown below:

Next, return to the Zummer folder to create a “shortcut” to zummer.exe. Right-click on the zummer.exe file, the select “Create Shortcut”. A shortcut file will be created as shown below:

Next, Drag/Drop the shortcut to your desktop. You are now ready to run Zümmer from your desktop for the first time. The shortcut file on your desktop should appear as shown below:

Zümmer Shortcut Icon

Double-click on the Zümmer Shortcut, to run Zümmer for the first time.

Note: If you have Windows Defender, Norton Download Insight, or some other protection software, a warning message may appear since these Programs do not have conclusive information regarding zummer.exe. Whatever software is present, select the “Run Anyway” option.

Step 3: Running Zümmer for the first time

The Zümmer application will open as shown below:

Next, from the Main Menu, select “Help” -> “About Zümmer” to display the About Zümmer window displayed below:

The “About Zümmer” window shown above, contains some very important information about your application.

1) Circled in Blue is the date of your license expiration date. If you have purchased a full license, the expiration date will be some time in 2044 or even later. If your full license expiration date arrives and you are still using Zümmer, first congratulate yourself, and then contact FoxQuest Systems, Inc. for instructions for extending your license.

2) Circled in Red is the current Release date of the version you are currently using. If some time has elapsed between the current date and the Release date, follow the instructions below to upgrade your Zümmer application.

3) Circled in Orange is the name of the Registered Owner of the Zümmer. FoxQuest Systems Inc., reminds you that this is a copyright protected application and therefore insists that you refrain from making unauthorized copies of this application.

4) The System Info… commandbutton provides valuable information about your computer’s configuration.

Click on OK to proceed to Step 4.

Step 4: Connecting your Schedule Data to the Zümmer Application with SQLite.

From the Main Menu, Select “Settings”->”SQL Connection”, then click on the “SQLite” tab.

In the editbox above, type in the path to the “PPMDBSQLITE.DB” containing your Schedule Data. Alternatively, click on the “Browse…” commandbutton to navigate to the file you are using to store your Schedule Data.

If you’re not sure of the location of the SQLite file containing your Schedule Data, then open the P6 Application. In the Login to P6 screen as shown below, click on the Database ellipse commandbutton:

The Edit Database Connections windows is then displayed as shown below:

 The path and filename to your Schedule Data is displayed to the right of the “Details:” label.

When the path and filename to your Schedule Data is displayed in the Zümmer SQL Connection Settings window, click on “SQL Connect” commandbutton. A correct connection will display the following SQL Connect Message as shown below:

Finally verify the connection by clicking on the Schedule Analysis & Comparison commandbutton to display the Projects in your Schedule Data.

Your connection is successful. Congratulations, You are ready to use and experience the Zümmer application!

Click here to learn how to perform a Schedule Analysis.

Click here to learn how to perform a Schedule Comparison.

Copyright ©2020 FoxQuest Systems, Inc. – All Rights Reserved

Download & Install 30 Day Free Trial for MS-SQL Configuration.

Follow these Steps to Download, Install and configure Zümmer for an MS-SQL (not SQLite) data source.

Step 1:
Access the Zümmer download files from here:

From the Website sample download screen shown below, select the Download option, then select the save option to download the files. The files will be downloaded to your “Downloads” folder or to your configured downloads location.

Click OK to continue with the download procedures.

Next, navigate to the Downloads folder, then look for the Zummer – 30 Day – SQL.zip file.

Step 2: Unzip the Zummer files and copy files to a local drive & folder:

Double-click on the Zummer – 30 Day – SQL.zip file to display the Zummer folder as shown below:

Copy the Zummer folder shown below to an appropriate place on your Personal Computer or local drive. It is highly recommended that the Zümmer be placed somewhere in the “Documents” or “My Documents” folder.

Open the Zummer folder, then verify that the download has completed successfully. The Zummer folder consists of 16 files and 4 subfolder as shown below:

Next, open the Data folder, then verify that the folder consists of 25 files as shown below:

Next, return to the Zummer folder to create a “shortcut” to zummer.exe.

Right-click on the zummer.exe file, the select “Create Shortcut”. A shortcut file will be created as shown below:

Next, Drag/Drop the shortcut to your desktop. You are now ready to run Zümmer from your desktop for the first time.

The shortcut file on your desktop should appear as shown below:

Step 3: Running Zümmer for the first time

Double-click on the Zümmer Shortcut, to run Zümmer for the first time.

Note: If you have Windows Defender, Norton Download Insight, or some other protection software, a warning message may appear since these Programs do not have conclusive information regarding zummer.exe. Whatever software is present, select the “Run Anyway” option.

The Zümmer application will open as shown below:

Next, from the Main Menu, select “Help” -> “About Zümmer” to display the About Zümmer window displayed below:

The “About Zümmer” window shown above, contains some very important information about your application.

  • Circled in Blue is the date of your license expiration date. If you have purchased a full license, the expiration date will be some time in 2044 or even later. If your full license expiration date arrives and you are still using Zümmer, first congratulate yourself, and then contact FoxQuest Systems, Inc. for instructions for extending your license.
  • Circled in Red is the current Release date of the version you are currently using. If some time has elapsed between the current date and the Release date, follow the instructions below to upgrade your Zümmer application.
  • Circled in Orange is the name of the Registered Owner of the Zümmer. FoxQuest Systems Inc., reminds you that this is a copyright protected application and therefore insists that you refrain from making unauthorized copies of this application.
  • The System Info… commandbox provides valuable information about your computer’s configuration.

Click on OK to proceed to Step 4.

Step 4: Connecting your Schedule Data to the Zümmer Application with MS-SQL.

From the Main Menu, Select “Settings”->”SQL Connection”, then click on the “MS SQL” tab.

  1. In the “SQL Driver” textbox, enter the name of SQL Driver used for this connection. “SQL Server” is  the default driver for an MS-SQL and probably require no revisions.
  2. In the “Server” textbox, enter the name of the server where the data is located. This can also be an IP address in the form “100.100.100.100”.
  3. In the “Database” textbox, enter the name of P6 Database containing your Schedule Data.
  4. Enter the “login ID” and “Password” for this connection. This entry is probably not the same as your username and password to access P6. Contact your Database Administrator for this information.
  5. Enter the Work Station ID. The default is 1 and probably requires no revision.

If you’re not sure of the location of the MS-SQL Server or Database names containing your Schedule Data, then open the P6 Application. In the Login to P6 screen as shown below, click on the Database ellipse commandbutton:

The Edit Database Connections windows is then displayed as shown below:

The Server name and Database name are displayed on the right of the “Details:” text. The Server name is displayed to the left of the “:”; the Database name is displayed to the right of the “:”.

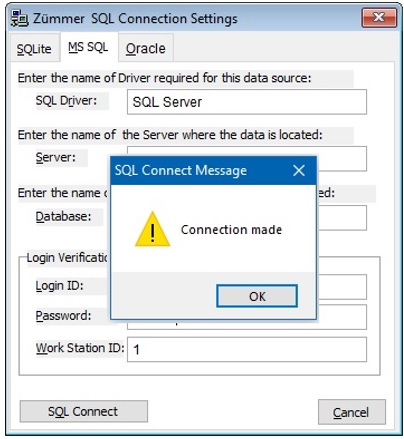
When the MS-SQL connection parameters to your Schedule Data is entered in the Zümmer SQL Connection Settings window, click on the “SQL Connect” commandbutton. A correct connection will display the following SQL Connect Message as shown below:

Finally verify the connection by clicking on the Schedule Analysis & Comparison commandbutton to display the Projects in your Schedule Data.

Your connection is successful. Congratulations, You are ready to use and experience the Zümmer application!

Click here to learn how to perform a Schedule Analysis.

Click here to learn how to perform a Schedule Comparison.

Copyright ©2020 FoxQuest Systems, Inc. – All Rights Reserved

Download, Install 30 Day Free Trial for Oracle Configuration.

Follow these Steps to Download, Install and configure Zümmer for an Oracle data source.

Step 1:

Access the Zümmer download files from here:

Click OK to continue with the download procedures.

Next, navigate to the Downloads folder, then look for the Zummer – 30 Day – Oracle.zip file.

A screenshot of a cell phone

Description automatically generated

Step 2: Unzip the Zummer files and copy files to a local drive & folder:

Double-click on the Zummer – 30 Day – Oracle.zip file to display the Zummer folder as shown below:

A screenshot of a cell phone

Description automatically generated

Copy the Zummer folder shown below to an appropriate place on your Personal Computer or local drive. It is highly recommended that the Zümmer be placed somewhere in the “Documents” or “My Documents” folder.

Open the Zummer folder, then verify that the download has completed successfully. The Zummer folder consists of 16 files and 4 subfolder as shown below:

Next, open the Data folder, then verify that the folder consists of 25 files as shown below:

A screenshot of a cell phone

Description automatically generated

Next, return to the Zummer folder to create a “shortcut” to zummer.exe.

Right-click on the zummer.exe file, the select “Create Shortcut”. A shortcut file will be created as shown below:

Next, Drag/Drop the shortcut to your desktop. You are now ready to run Zümmer from your desktop for the first time.

The shortcut file on your desktop should appear as shown below:

Step 3: Running Zümmer for the first time

Double-click on the Zümmer Shortcut, to run Zümmer for the first time.

Note: If you have Windows Defender, Norton Download Insight, or some other protection software, a warning message may appear since these Programs do not have conclusive information regarding zummer.exe. Whatever software is present, select the “Run Anyway” option.

The Zümmer application will open as shown below:

Next, from the Main Menu, select “Help” -> “About Zümmer” to display the About Zümmer window displayed below:

A screenshot of a cell phone

Description automatically generated

The “About Zümmer” window shown above, contains some very important information about your application.

  1. Circled in Blue is the date of your license
    expiration date. If you have purchased a full license, the expiration date will
    be some time in 2044 or even later. If your full license expiration date
    arrives and you are still using Zümmer, first congratulate yourself, and then
    contact FoxQuest Systems, Inc. for instructions for extending your license.
  • Circled in Red is the current Release date of the
    version you are currently using. If some time has elapsed between the current
    date and the Release date, follow the instructions below to upgrade your Zümmer
    application.
  • Circled in Orange is the name of the Registered
    Owner of the Zümmer. FoxQuest Systems Inc., reminds you that this is a
    copyright protected application and therefore insists that you refrain from
    making unauthorized copies of this application.
  • The System Info… commandbox provides valuable
    information about your computer’s configuration.

Click on OK to proceed to Step 4.

Step 4: Connecting your Schedule Data to the Zümmer Application with ORACLE.

From the Main Menu, Select “Settings”->”SQL Connection”, then click on the “Oracle” tab.

  1. In
    the “SQL Driver” textbox, enter the name of the Oracle SQL Driver used for this
    connection. “{Oracle in XE}” is  the
    default driver for an Oracle Express configuration and probably require no
    revisions if the Oracle Express installation was initially performed.


  2. In
    the “Server” textbox, enter the name of the server where the data is located.
    The Server name for an Oracle Express installation is “XE”.


  3. Enter
    the “login ID” and “Password” for this connection that was entered during the
    Oracle Express Edition installation procedure as shown below. This entry is
    probably not the same as your username and password to access P6. Contact your
    Database Administrator for this information. The “Login ID” for an Oracle
    Express installation is typically “System”.
A screenshot of a cell phone

Description automatically generated

If you’re not sure of the name of the ORACLE Server containing your Schedule Data, then open the P6 Application. In the Login to P6 screen as shown below, click on the Database ellipse commandbutton:

A screenshot of a cell phone

Description automatically generated

The Edit Database Connections windows is then displayed as shown below:

A screenshot of a cell phone

Description automatically generated

Highlight the Database name containing the Schedule Data, then the Server name is displayed on the right of the “Details:” text.

When the Oracle connection parameters to your Schedule Data is entered in the Zümmer SQL Connection Settings window, click on the “SQL Connect” commandbutton. A correct connection will display the following SQL Connect Message as shown below:

A screenshot of a cell phone

Description automatically generated

Finally verify the connection by clicking on the Schedule Analysis & Comparison commandbutton to display the Projects in your Schedule Data.

Your connection is successful. Congratulations, You are ready to use and experience the Zümmer application!

Click here to learn how to perform a Schedule Analysis.

Click here to learn how to perform a Schedule Comparison.

Copyright ©2020 FoxQuest Systems, Inc. – All Rights Reserved

Keep Global Calendars to Yourself!

Stop the Proliferation of Global Calendars – a Step-by-Step Guide

Many construction project specifications state that Global Calendars and Global Activity Codes (Global Activity Codes will be discussed in a separate article) are not to be included in the Project Schedule. The reason is that the Owner or Agency wants to control the number of Global Calendars in their P6 Schedule Network.

Imagine a large agency such as a State Department of Transportation that receives Project schedules from scores of Contractors. If the Global Calendars are not properly managed, the Department can easily wind up with literally hundreds of Global Calendars of which many may not be easily attributable to a source Project or Contractor. Also, imported Global Calendars probably do not have a typical convention structure or time configuration which may inadvertently be used as the source of another Project Calendar. Additionally, existing Global Calendars could be overwritten if Global Calendars are imported with the same Calendar name.

In general, Global Calendars are intended to be used only for creating Project or Resource Calendars. Therefore, Global Calendars should never be transferred from one party to another.

For those submitting Project Schedules to other parties, the submitter should make sure that Global Calendars are not included in the export file (typically the .XER file). Submitting Global Calendars to other parties not only populates other P6 Users with superfluous Global Calendars but is bad form and should be avoided.

For those who receive Project Schedule from other parties, the recipient should make sure that the import file (typically the .XER file) does not contain Global Calendar. Otherwise, before long, the recipient’s Global Calendar list will contain scores of unrecognized, duplicate and unassigned Global Calendars.

At this point, you may consider attempting to purge and delete unused Global Calendars. However, this task can be more difficult than what may appear at first.

The following step-by-step procedure provides a guideline for cleaning up the Global Calendars List.

1. Create a Global Calendar naming convention that clearly distinguishes your Global Calendars from all other Global Calendars.

In the illustration below, the 8 highlighted Global Calendars names are preceded by a “*” then coded by “GC” prefix and a unique 2 digit number.

The “*” prefix helps to make sure that when sorting by Calendar Name, the Global Calendars to keep are sorted to the top of the grouping. The “GC” prefix identifies the Calendar as a Global Calendar.

Using this type of convention allows P6 Users to easily spot authentic Global Calendar usage within a P6 Project and to identify those Global Calendars that are candidates for deletion. In addition, clearly identified Global Calendars facilitates stepping through the remaining checks & procedures.

2. Create a Global Calendar naming convention that clearly distinguishes other Global Calendars, from Project and Resource Calendars. These Global Calendars are candidates for deletion.

In the illustration below, note that the other listed Global Calendar names are preceded by a “GC” then coded with a unique 2 digit number and continue with a Calendar Name.

3. Attempt to remove all Global Calendars that are candidates for deletion.

Starting with the first Global Calendar candidate for deletion, click on the Delete button shown above.

Case 1: Confirmation with “Are you sure…” window.

If the confirmation window appears above and you are sure the Global Calendar can be deleted, the select “Yes” and proceed to the next Global Calendar candidate for deletion.

Case 2: Error Message appears – Calendar [Calendar Name] cannot be deleted because it is used by activities in other projects.

If the error message window above appears above, then click OK. Proceed through the next steps to be able to delete the selected Global Calendar.

Click on the Used By… command button to display the Projects and/or Resources that are using the selected Global Calendar.

For each listed Project ID, open the Project ID, then filter the Project to display all activities.

If the Project ID is not listed in the EPS nodes, then the Project ID is embedded as Baseline in one of the Projects residing at the EPS Level. This may be a time consuming effort is the EPS Level Project ID is not immediately known. Once found, restore the Project ID, then follow the Steps above to remove Global Calendars embedded in a Baseline Project.

Next, Group and Sort the activity list by Calendar with the Indent Checkbox selected as shown below.

Next, collapse the list so that all the activities are not shown as shown below:

Collapse the activity list so that only the Groups appear. In the illustration below, the activities are collapsed. Note that Project Activity ST03 – 6 Day Standard Workweek, is indented under “*GC-06 – 6 Day Standard – no Holidays”.

If a Calendar Level 2 exists, then the Project contains Project Calendars that are inheriting from Global Calendars. Follow Step 5 to change the Inherited Global Calendar setting to <none>.

Continue assigning re-activities from a Global Calendar to a Project Calendar. If a Project Calendar does not exist for the activity, then create a new Project Calendar from a Global Calendar (making sure that inheritance is set to <none>. Complete this process until all activities are assigned to a Project Calendar.

Next Group by Resource, then follow Step 7 to assign Resource Calendar to the Resources used in the Project. Complete this process until all activities are assigned to Resources that are assigned to a Resource Calendar.

Finally, close the Project then delete the unwanted Global Calendar. Continue this process until all unwanted Global Calendar candidates are deleted. The remaining Global Calendars are valid and should remaining in the Project Network.

4. Unassign all remaining valid Global Calendars.

Next, for each valid Global Calendar attempt to the delete the specific Calendar. Since the Default Global Calendar cannot be deleted, temporarily assign another Global Calendar as the Default. If the confirmation textbox appears to delete the Calendar, select No, then continue to the next Global Calendar.

If P6 cannot delete the selected Global Calendar, then follow the instructions found in Step 3, Case 2 above.

Continue this process until all valid Global Calendars are not assigned to P6 Projects.

The next steps below ensure that exported Project files do not contain any Global Calendars. Even though Projects do not contain activities or resources assigned to Global Calendars, you can still wind up with Global Calendars contained in the export Project file.

5. Ensure that no Project Calendars are inheriting from Global Calendars.

When a Project Calendar is created from a Global Calendar, the Project Calendar automatically inherits its properties from the selected Global Calendar. In the sample below, the Project Calendar “PC-01 – 7 Day WrkWk – No Holidays” is inheriting from the Global Calendar “*GC-01 – 7 Day WrkWk – No Holidays ”.

Left this way, the inherited Global Calendar is automatically brought in when an .XER file is created.

For each Project Calendar ensure that the Project Calendars are not inheriting from a Global Calendar by selecting the Modify… command button as shown below.

Next scroll through the Global Calendar list, then select <none> from the pull-down menu as shown below.

To prevent a Global Calendar from making its way into the .XER as a result of Inheritance,  set all Project Calendar’s inheritance to “<none>”. In the illustration above, the pull-down menu is expanded to display the “<none>” option from the list of Global Calendars.

6. Ensure that Projects do not Default to a Global Calendar.

Every Project has an assigned Default Calendar. The setting for the Default Calendar for a Project can be seen in the Project’s Default Page in the Project’s Detail window as shown below.

When a new Project is created from scratch, P6’s designated Default Project Calendar is automatically assigned as the Default Calendar for the Project. When a Project has a Global Calendar as the Default Project Calendar, then that Global Calendar will be saved in the exported .XER file.  

To prevent a Global Calendar from making its way into the .XER as a result of Default Calendar settings, first, open the Project, then select a Project Calendar as the Default Calendar.

7. Ensure that Resources assigned to activities do not have a Calendar Profile referencing to a Global Calendar.

All Resources are assigned a Calendar which can be viewed in the Details ->Profile selection window. When a new Resource is created from scratch, P6’s designated Default Project Global Calendar is automatically assigned as the Default Calendar for the Resource. In the illustration below, the Carpenter resource Calendar Profile is assigned to a Global Calendar.

Resources can either be assigned to a Personal Calendar or be assigned to a previously created Shared Resource Calendar.

To prevent a Global Calendar from making its way into the .XER file, all Resources that are assigned to the Project’s activities must be assigned to either a Shared Resource Calendar or a Personal Calendar. Furthermore, whether a Shared Resource or Personal Calendar is used, the assigned Calendar must not be inheriting from a Global Calendar (See Step 5 above).

8. Final QA/QC .XER visual inspection.

Checking an .XER for Global Calendars is easy. Simply open the file using a text editor such as Notepad then scroll down to the Calendar Table (%T) section as shown below: 

Below that line, now look for a Record line starting with (%R). Reading to the right, the 7th field, which displays the Record value for field name (%F) “clndr_type” is displayed. The three possible Record values for the Field “clndr_type” (Calendar Type) is:

  1. CA_Base: Identifying a Global Calendar;
  2. CA_Project: Identifying a Project Calendar;
  3. CA_Rsrc: Identifying a Resource Calendar.

If “CA_Base” exists as a Calendar Type, then a Global Calendar exist for the Project contained in the .XER File.

If you submit schedules in .XER format and “CA_Base” is contained in the .XER file, then go back and follow the steps above to remove any reference to a Global Calendar.

If you receive schedules in .XER format and “CA_Base” is contained in the .XER file, then return the .XER file to the submitting party for correction.

Keeping a “Lean & Mean” Global Calendar list helps stop the proliferation of redundant and superfluous Global Calendars.

Copyright ©2019 FoxQuest Systems, Inc. – All Rights Reserved

Activities with No Finish Side Successors

The Precedence Diagram Method (PDM) of defining relationships between activities is a powerful tool. Often, however, Schedulers, sometimes unknowingly, misuse the options available when defining relationships between activities.

In the illustration below, Activity “E” is assigned to “B” as a predecessor with relationship Finish-to-Start (FS) and is assigned to “F” with relationship Start-to-Start (SS).

Since “F” has a predecessor and a successor activity, it does not violate the “No Open Ends” rule. In fact, running the P6 Global filters, “Activities without Predecessors” and “Activities without Successors” will display no results.

However, since “E” is related to its only successor, “F” using SS, “E” does not effectively contribute to the CPM network. In fact, when “E’s” status is updated to “In Progress”, it essentially behaves like an “open ended” activity yet still complies with the “No Open Ends” rule.

Unfortunately, in P6, there is no Filter that can be constructed to check for “no finish side successors”. However, Zümmer checks this anomaly with Report #14 – “Activities With No Finish Side Successor”.

The converse to this issue is “Activities with No Start Side Predecessors”

Copyright ©2019 FoxQuest Systems, Inc. – All Rights Reserved

Expense Profile Data – Output to Excel

Improve your Expense Profile presentations through Zümmer’s Excel output feature

When the “Expense Profile With Actuals” Curve is selected for previewing or printing, in addition to the printed/previewable report, Zümmer generates an Excel spreadsheet supplemental file for the curve produced in the report.

The spreadsheet output file is stored in the Zummer/Output folder. In the illustration below, the Project MH-BL1-UP33 was selected for printing with the file listed. Note the file structure prefix consists of “EXP” then the next filename segment consists of the Project ID, “MH-BL1-UP33”. The final filename segment is a 5-digit computer system generate suffix.

Zümmer automatically saves the Expense Profile Data to an Excel File in the Output folder

The “EXP” file in the “Chart1” Tab contains the “Expense Profile With Actuals” Curves shown as below:

A screenshot of a cell phone

Description automatically generated
Chart1 display

Since the file above is generated by a spreadsheet, the visual content can be customized by the user and/or Cut/Copy & Pasted into another document.

In the “EXP” file above, shown below is a partial section of the ChartData tab and the raw data used to plot the curve shown above: (Rows 6 thru 241 and 247 thru 1076 are hidden for instructional purposes).

ChartData display

Column A contains the series of dates from the earliest date in the selected Project listing daily down to the latest date in the selected Project.

Columns B, C and D contain the cumulative Early, Late and Average Expense Series respectively for the Expense Profile curve on the graph displayed in the Chart1 tab.

Column E contains the cumulative Actual Expense Series for the Expense Profile curve on the graph displayed in the Chart1 tab.

Column F contains the Total Budgeted Expense amount used to generate the vertical Data Date line in the graph.

Columns G, H, I and J contain the daily total Early, Late, Average and Actual Expense Series respectively used to calculate the cumulative values shown in Columns B, C, D and E respectively.

Copyright ©2019 FoxQuest Systems, Inc. – All Rights Reserved

Tasks With Start-To-Start Relationships And No Lag

The PDM (Precedence Diagram Method) method of defining relationships between activities is a powerful tool. Often, however, Schedulers, sometimes unknowingly, misuse the options available when defining relationships between activities. In the illustration below, under Method 1, Activity “A” is related to “B” using Finish-To-Start (FS) and “B” is related to “C” using Start-To-Start (SS) with Lag = 0.

This may appear as a reasonable approach as often, the Activity Name description(s) may provide a false justification for this relationship. Unfortunately, the Forward and Backward pass doesn’t care about your Activity Name description. Therefore, trying to justify the use of Method 1 by using a “real world” situation fails as an argument to promote its use.

The Forward and Backward Pass doesn’t care about your Activity Name description.

By observation, since “B” has a shorter duration than “C”, “B” should have a higher Total Float (TF) value than “C”. However, when calculated, the TF for “B” = 0. Under Method 1, the SS/Lag = 0 relationship between “B” and “C” is causing the critical path to flow through the only the Start of “B” resulting in an incorrect TF value for “B”.

By representing “B” as a critical activity, the result could lead to a possible misallocation of resources. Furthermore, if the correct TF value “B” is later discovered, then this could cause a loss in trust in the schedule.

The solution is to follow Method 2, i.e. “A” is related to “B” using FS and “A” is related to “C” using FS. Not only is this trap avoided but relationships between activities are more clearly defined.

Zümmer checks this anomaly with Report #37 – “Tasks With Start-To-Start Relationships And No Lag” reports all instances. In the illustration below, each Start-To-Start relationship with no lag is clearly and individually paired. In addition, the Activity Status of the predecessor and successor is listed along with each Original Duration, Total Float, type of Relationship and lag value between the two activities.

Copyright ©2019 FoxQuest Systems, Inc. – All Rights Reserved

Tasks With Finish-To-Finish Relationships And No Lag

The PDM (Precedence Diagram Method) method of defining relationships between activities is a powerful tool. Often, however, Schedulers, sometimes unknowingly, misuse the options available when defining relationships between activities. In the illustration below, under Method 1, Activity “B” is related to “C” using Finish-To-Finish (FF) with Lag = 0.

This may appear as a reasonable approach as often, the Activity Name description(s) may provide a false justification for this relationship. Unfortunately, the Forward and Backward pass doesn’t care about your Activity Name description. Therefore, trying to justify the use of Method 1 by using a “real world” situation fails as an argument to promote its use.

The Forward and Backward Pass doesn’t care about your Activity Name description.

In Figure 1 above, by observation, since “C” has a shorter duration than “B”, the Early Start (ES) for “C” is misrepresented since “C” can start at the completion of “A”. Furthermore, the Total Float (TF) is equally misrepresented since the Early Finish (EF) is the same as “B”.

If there is no lag (say this to yourself a few times) between “B” and “C”, then the finish of both “B” and “C” are equally responsible for starting “D”. Neither “B” or “C” have priority over controlling the start date of activity “D” with respect to logic. With respect to Duration however, activity “B” alone controls the start date of activity “D”. Therefore, the correct approach is to relate “B” FS to “D”.

In Method 1 above, activity “C” is behaving as if it was constrained using the “As Late as Possible” option. By misrepresenting the ES of “C”, the result could lead to an inadvertent impact to the Project Completion date by starting “C” too late. This could cause a loss of trust in the schedule. The solution is to follow Method 2, i.e. “B” is related to “D” using FS. Not only is this trap avoided but relationships between activities are more clearly defined.

After all this, if you’re still not convinced and still feel the need to use the FF 0, then consider re-assigning the scope of work between Activities “B” and “C”. Consider separating the scope of the tasks so that the finish portion of Activity “C” is now included as part of Activity “B” and the start portion of Activity “C” starts at the completion of Activity “A”. Normalizing CPM Network logic to the basic Finish-to-Start relationships avoids confusion and possible erroneous Start/Finish dates and Total Float values.

Zümmer checks this anomaly with Report #35 – “Tasks With Finish-to-Finish Relationships And No Lag” reports all instances. In the illustration below, each Finish-To-Finish relationship with no lag is clearly and individually paired. In addition, the Activity Status of the predecessor and successor is listed along with each Original Duration, Total Float, type of Relationship and lag value between the two activities. Relationships with lower Total Float values have a higher resolution priority over relationships with a higher Total Float value.

Zümmer Analysis Report #35

Copyright ©2019 FoxQuest Systems, Inc. – All Rights Reserved

Non-Overlapping Lags

Generally, in a CPM Network, lag values should be smaller than the duration values of either its predecessor or successor activity.  In other words, lags should not cause gaps in the flow of activities through the CPM network. Unfortunately, this is a very easy mistake to make and worse, far more difficult to detect.

There are 4 possible cases where a non-overlapping lag may occur:

Case 1:

The Negative Lag is greater than the sum of the Predecessor’s Original Duration and the Successor’s Original Duration (Figure 1).

Figure 1

Suppose the Original Duration (OD) for Activities “A” and “B” are set to 5 Days each and the relationship is set to Finish-To-Start (FS) with a lag of -9 Days. This is overlapping since the sum of the durations of “A” and “B” is 10 Days.

Now Suppose, the OD for activities “A” and “B” are each reduced to 2 Days. Unless the relationship between “A” and “B” is changed, a non-overlapping condition will occur (Figure 1) since the absolute value FS lag of -9 Days is greater than the OD of “A” plus the OD of “B” (now at 4 Days). The gap between activity “A” and “B” is now 5 Days caused by the non-overlapping lag.

In P6, no Filter that can be constructed to check for this type of Non-Overlapping Lag.

Zümmer Analysis Report #31 – “Negative Lag Greater Than Sum of Both Original Durations” identifies the Non Overlapping lag condition “Neg Lag > Pred OD + Succ OD”. In the Figure 2 below, each non-overlapping relationship is clearly and individually paired. In addition, the Activity Status of the predecessor and successor is listed along with each Original Duration, the type of Relationship and lag value between the two activities.

Figure 2

Case 2:

A Positive Finish-To-Start lag is used between 2 Activities (Figure 3)

Figure 3

Suppose the Original Duration (OD) for Activities “A” and “B” are set to 7 Days each and the relationship is set to Finish-To-Start (FS) with a lag of -2 Days. This is overlapping since the sum of the durations of “A” and “B” is 14 Days.

Now suppose the lag value is then changed to +7 Days. The gap between activity “A” and “B” is now 7 Days caused by the non-overlapping lag.

In P6, no Filter that can be constructed to check for this type of Non-Overlapping Lag.

Zümmer Analysis Report #32 – “Activities with Finish-To-Start Relationship & Positive Lag” identifies the Non Overlapping lag condition “FS with Positive Lag”. In Figure 4 below, each non-overlapping relationship is clearly and individually paired. In addition, the Activity Status of the predecessor and successor is listed along with each Original Duration, the type of Relationship and lag value between the two activities.

Figure 4

Case 3:

A Start-To-Start Lag is greater than the Predecessor’s Original Duration (Figure 5).

Figure 5

Suppose the Original Duration (OD) for Activities “A” and “B” are set to 15 Days and the relationship is set to Start-To-Start (SS) with a lag of 8 Days. This is acceptable since “A” and “B” overlap.

 Suppose now, the OD for “A” is reduced to 5 Days. Unless the relationship between “A” and “B” is changed, a non-overlapping condition will occur since the SS lag of 8 Days is greater than the OD of “A” (now at 5 Days). The gap between activity “A” and “B” is now 3 Days caused by the non-overlapping lag.

In P6, no Filter that can be constructed to check for this type of Non-Overlapping Lag.

Zümmer Analysis Report #33 – “Start-To-Start Relationships & Lag Greater Than Predecessor’s Original Duration” identifies the Non Overlapping lag condition “SS Lag > Predecessor OD”. In Figure 6 below, each non-overlapping relationship is clearly and individually paired. In addition, the Activity Status of the predecessor and successor is listed along with each Original Duration, the type of Relationship and lag value between the two activities.

Figure 6

Case 4:

A Finish-To-Finish Lag is greater than the Successor’s Original Duration (Figure 7)

Figure 7

Suppose the Original Duration (OD) for Activities “A” and “B” are set to 15 Days and the relationship is set to Finish-To-Finish (FF) with a lag of 8 Days. This is acceptable since “A” and “B” overlap.

Suppose now, the OD for “B” is reduced to 5 Days. Unless the relationship between “A” and “B” is changed, a non-overlapping condition will occur since the FF lag of 8 Days is greater than the OD of “B” (now at 5 Days). The gap between activity “A” and “B” is now 3 Days caused by the non-overlapping lag.

In P6, no Filter that can be constructed to check for this type of Non-Overlapping Lag.

Zümmer Analysis Report #34 – “Finish-To-Finish Relationships & Lag Greater Than Successor’s Original Duration” identifies the Non Overlapping lag condition “FF Lag > Successor OD”. In Figure 8 below, each non-overlapping relationship is clearly and individually paired. In addition, the Activity Status of the predecessor and successor is listed along with each Original Duration, the type of Relationship and lag value between the two activities.

Figure 8

Copyright ©2019 FoxQuest Systems, Inc. – All Rights Reserved

The Partial Day Effect

Finding and eliminating “Partial Days” is an important part of a Scheduler’s QA/QC routine.

A deeper look into the Partial Day Effect

Since most CPM scheduling performed in the construction industry measures time to the nearest day, calculating overall project durations by summing tasks containing units of measure less than a whole day should be strictly avoided. Keep in mind that schedulers are not timekeepers and they should resist the temptation to calculate the overall project time using durations more precise that a whole day. Furthermore, since schedulers typically record actual dates to the nearest day, it doesn’t make sense to calculate future dates to anything more precise than whole days.

The “Partial Day” (or Fractional Day) Effect is defined as:

  1. Tasks that do not start at the beginning of the day.
  2. Tasks that do not finish at the end of the day.
  3. Tasks that have non-integer day value for their Original or Remaining Duration.
  4. Tasks that have non-integer day value for their Total Float or Free Float.
  5. Lags that have non-integer day values.

The Partial Day Effect manifests itself when upon browsing the calculated dates in a CPM schedule; you or someone else notice activities are starting on the same day as its predecessor’s finish date. This can cause confusion especially with experienced CPM users who are accustomed to seeing predecessor finish dates completing on the day before (or just before) the successor’s start date.

In Figure 1 below, the User Preferences Time option is set to “Do not show time”. Note that the Early Finish date for Activity “A1040 – Activity C1” is 09-Jun-16 which is the same date for the Early Start of its successor, Activity “A1050 – Activity F”. In addition, Activity “A1060 – Activity C2” has the same Original and Remaining Duration as Activity C1 yet is not on the Critical Path. Furthermore, the layout is grouped by Total Float; however there are 2 separate groups for the same Total Float value of 0. How can this be?

Figure 1

In Figure 2 below, the User Preferences Time option is now set to “24 hour (13:30)” Under these settings, the Partial Day Effect is revealed by observing the Datetime format of Start and Finish dates.

Figure 2

The Partial Day Effect in this situation was caused due to how each activity was statused.

  1. A1020 was updated by assigning a Duration Percent Complete of 35%.
  2. A1060 was updated by assigning a Remaining Duration (RD) of 16 days.

P6 calculates the RD for A1020 as 25*(1-.35) or 16.25 Days. The .25 remainder (or 2 hours) is reflected in the Finish date as 09-Jun-16 10:00 (10AM). Meanwhile, A1060 displays the same RD as A1020; however, the Finish date is reflected as 08-Jun-16 at 17:00 (5PM). Furthermore, A1060 is not on the Critical Path even though the Total Float (TF) value is displayed as 0 (the Duration Format Decimal value for the Day Unit of Time is set to 0).

The Partial Day Effect is also caused by how P6 stores dates and durations. In the typical P6 Duration fields such as Original Duration and Remaining Duration the default entry mode is to display durations in days. However, the actual duration value stored in the P6 database is in Hours. In the Figure 3 below, the activities in Figures 1 and 2 are shown with their native field names and values for their Original Duration (Target_drtn_hr_cnt); Remaining Duration (Remain_drtn_hr_cnt); Total Float (Total_float_hr_cnt);  and Free Float (Free_flt_drtn_hr_cnt).

Figure 3

The conversion occurs as a result of the Calendar setting value entered under the Hours/Day textbox in the Hours per Time Period window as shown in Figure 4 below.

Figure 4

Since the Work-Hours per day entry is “8” in Hours/Day, P6 automatically performs the “on-the-fly” mathematical conversion as values are entered. Therefore, for Activity 1020, the Original Duration entry of 40 is natively stored as 40*8 or 320 in the Task table’s “Target_drtn_hr_cnt” field. Similarly, the Remaining Duration, calculated as 35% Complete, is stored as 25*(1-.35)*8 or 130 in the Task table’s “Remain_drtn_hr_cnt” field.

Storing data in hours, instead of days often causes the Partial Day Effect when “mixed” calendars are used.

Mixing Calendars in a CPM Network

Typically, schedulers define their calendars to model whole days consistent with typical construction work environments in their area. For example, a typical calendar structure consists of a work-day that starts at 8:00AM, breaks for lunch from 12 Noon to 1:00PM and ends at 5:00PM for a total work-day of 8 Hours/Day. Based on these parameters, a typical P6 5-Day Work-Week Global or Project Calendar would have the following configuration in Figure 5 below.

Figure 5

6-Day Work-Week and 7-Day Work-Week would follow the same configuration but with the added additional Nonwork days accordingly.

Often, this convention above is violated when for example; a 24 Hour Calendar is used for concrete curing activities or some other type of “round-the-clock” activity. For this reason, I strongly discourage the use of 24-Hour calendar under any circumstance. For these types of activities, a 7-Day Work Week Calendar based on an 8 Hour per day and no holidays is the best option and works just as well. Many articles “for instructional purposes” use a 24-Hour Calendar that is assigned to a concrete curing activity or other “round-the-clock” activity. This option should be avoided in real-time construction activities since it is problematic and is often the root cause of Partial Days.

In the Figure 6 below, two “7-Day Cure” activities are used between a concrete pour activity and a concrete form activity. Activity ST8420 is assigned to a 7-Day Calendar using an 8 Hour per day format. Activity ST78430 is assigned to a 7-Day Calendar using a 24 Hour per day format. Activity ST68920 and ST68180 are both assigned to a 5-Day “Field” Work-Day Calendar using an 8 Hour per day format. The activities below are grouped by Total Float value. Upon calculating the schedule, both Cure activities finish on the same day, however, they both calculate a different Total Float value.

The activity on the 7-Day/8Hr calendar correctly calculates the starting and finish date while the activity on the 7-Day/24Hr calendar starts on the same day as the Pour Footing activity (18-Oct-19). Also, the overall duration is shown as 7 Days but based on the displayed Start and Finish date equates to 8 Days.

In addition, there is an apparent discrepancy in the Free Float values. Since 25-Oct-19 falls on a Friday, the Cure activity on the 7-Day/8Hr Calendar correctly calculates the Free Float as 2 Days since the successor, Activity ST6810 start on Monday, 28-Oct-19. The Free Float on the 7-Day/24Hr Calendar incorrectly calculates the Free Float as 3 Days as shown below in Figure 6.

Figure 6

When the Time option is set to 24 Hours, the following values appear in Figure 7 below.

Figure 7

Note that the 24 Hour time setting reveals additional information to clear up the confusion. Note that the start time for Activity ST84730 is 17:00 (5:00PM). Since this activity is on a 24 Hour calendar, it starts immediately after its predecessor’s finish date. Activity ST78420 and ST87430 both correctly finish at the same time.

When the Duration value option is changed to 2 decimal places, the Original Duration, Remaining Duration, Total Float and Free Float reveal the actual calculated Duration values in Figure 8 below.

Figure 8

Note that the Total Float and Free Float values for Activity ST78430 are displayed as 2.63. This calculation is derived from the difference between the Late Finish and Early Finish.  Since the Late Finish is 28-Oct-19 at 08:00 and the Early Finish is 25-Oct-19 at 17:00, the difference is 63 Hours/24 Hours per Day or 2.63 Days (rounded to the nearest hundredth) as a direct result of using a 7-Day/24Hr Calendar.

Since calculating Project durations to the nearest whole day is preferred, the use of a 7-Day/24Hr Calendar is a root cause of the Partial Day Effect and therefore should be avoided. The Duration values compound when successor activities are later in the CPM network. This is because Total Float values are calculated based on the activity’s assigned Calendar.

Generating Partial Day Durations

There are many ways to generate Partial Day durations. Of these include:

  1. Entering a Percent Complete value for an activity assigned with “Duration Percent Complete”. For example, if an activity has an Original Duration of 3 days and a Duration Percent Complete is assigned 50%, then the activity will start at 8:00AM then having 1.5 Days remaining will complete at Noon on the second Day.
  2. Not assigning a whole Day value to a Remaining Duration. For example, if 1.5 Days is assigned as the Remaining Duration, then the Finish Date will complete at Noon.
  3. An activity has a Calendar assignment that is not consistent with a typical hour per day format.
  4. Assigning non-standard Calendars then using lags between activities with mixed format calendars.

However Partial Days are generated, they usually have a cascading effect through the CPM network that can make resolving this issue a difficult and painful task. Suppose for example, the first activity of a long CPM network path completes at 2:00PM. Then its next driving successor activity will start at 2:00PM on the same day and end at 2:00PM on its last day. This behavior will continue to cascade throughout the CPM network until there are no driving successors.

Determining if your CPM network contains Partial Days is easy! Simply;

  1. Go to the User Settings and select the option to turn on time as shown in Figure 9 below.
  2. Then, set Durations to display values to either 1 or 2 Decimal places shown in Figure 10 above.
Figure 9
Figure 10

Once this is done, you can browse the activities Start and Finish Dates to detect activities not starting at 8:00AM or not ending at 17:00PM.

Zümmer Analysis Reports

Zümmer contains the following reports to help resolve Partial Days (See also Figure 11 below):

  1. Analysis Report #26 – “Activities with Partial Day Durations”
  2. Analysis Report #27 – “Relationships with Partial  Lag”
  3. Analysis Report – “Not Completed Tasks with Partial Original or Remaining Durations”
  4. Analysis Report – “In-Progress Tasks with Partial Remaining Duration”
Figure 11

Zümmer Analysis Report #26 – “Activities with Partial Day Durations” (Figure 12 below) is a comprehensive report listing any activity containing a Partial duration in the Original Duration, Remaining Duration, Free Float or Total Float values. The report sorts by Activity ID and lists the Activity Status, Activity ID, Activity Name, Partial Original Duration, Partial Remaining Duration, Partial Total Float and Partial Free Float values.

Figure 12

Zümmer Analysis Report #27 – “Relationships with Partial Lag” (Figure 13 below) is a comprehensive report listing any Partial Lags.

Partial lags have a most insidious impact towards generating Partial Days. Changing the predecessor or successor activity to a standard Calendar does not necessarily guarantee that the lag will change in kind. Even in a moderately sized CPM network, finding these offending lags are very difficult using P6 alone.

Figure 13

Zümmer Analysis Report – “Not Completed Tasks with Partial Original or Remaining Durations” (Figure 14 below) is a subset of Analysis Report #26 displayed above.

Figure 14

Not Completed Tasks with partial Original or Remaining durations have a higher priority with regards to resolving Partial Days because they tend to produce a cascading effect to successor activities starting or ending in the middle of the day. Once these activities are normalized, i.e. adjusted to containing whole day values, successor activities in general will ‘fall in line’ starting at the beginning of the day and ending at the end of the day.

Zümmer Analysis Report – “In Progress Activities with Partial Durations” (Figure 15 below) is a subset of Analysis Report #26 displayed above.

Figure 15

In-progress tasks with partial Remaining Durations also have a higher priority with regards to resolving because they tend to produce a cascading effect to successor activities starting or ending in the middle of the day. Once these activities are normalized, i.e. adjusted to containing whole day values, successor activities in general will ‘fall in line’ starting at the beginning of the day and ending at the end of the day.

Conclusion

A few tips to avoid Partial Days in the first place:

  1. When performing a schedule update, turn on time to ensure calculated results start at 8:00AM and end at 5:00PM (or at your typical Start and Finish times).
  2. When performing a schedule update, set the Duration decimal to 1 (or 2) to view duration values in tenths.
  3. When declaring the Data Date, always set time on and set the Data Date time to include your typical Start time.
  4. When assigning start constraints, turn on time and set the constraint to include your typical Start time.
  5. When assigning finish constraints, turn on time and set the constraint to include your typical Finish time.
  6. When setting “Must Finish By” constraints for the Project, turn on time and set the date to include your typical Finish time.
  7. Use consistent “Hours per Day” configured Calendars especially when a lag value is assigned.
  8. Update in-progress activities based on Remaining Duration in whole days or;
  9. Update in-progress activities based on a completion date to include your typical Finish time.
  10. For consistency, when actualizing start dates, save Actual Start dates to include your typical Start time.
  11. For consistency, when actualizing finish dates, save Actual Finish dates to include your typical Finish time.
  12. If someone asks you to do an analysis or ‘What-if’ the work is accelerated from an 8 Hour day to a 10 Hour day, suggest doing the analysis on a 6 Day Work-Week instead of a 5 Day Work-Week. The difference in calculations is between a 50 Hour week and a 48 Hour week which for scheduling purposed should be acceptable.

Keeping a neat, tidy and “wholesome” CPM network with no Partial Days is an important part of a Scheduler’s QA/QC routine.

Copyright ©2019 FoxQuest Systems, Inc. – All Rights Reserved